Sunday, 10 November 2019

Magento 2 in localhost windows 10

Facing so many issues in running a Magento in the local environment on windows 10 😓. Yes I know that I too faced it. tried running the Magento in Xampp ended in issues while running the Magento admin...

But no worries here is a short solution. Don't worry its not a lengthy steps.

Here we go.

1) Download wamp 64 bit for windows 10. just google and get the last version. I have installed the 3.1.9 version. ( may this link will help). Run installation in administrator mode 

2) Just install wherever you need. But have the path in mind.

3) Download Magento. (https://magento.com/tech-resources/download). I have gone version 2.2.5 ( just for reference). feel free to explore last and let me know.

4) Extract the Magento zip to Wamp www directory ( D:\Installs\wamp64\www)  as magento2.   after extraction path will be D:\Installs\wamp64\www\magento2 

5) Check localhost in web browsers. you will get as below.
* Marked the php as 7.0.33, the magento 2 needs 7.0 or higher php version. if not having the same version choose for the wampserver64.


Here is the important setups before running localhost/magento2  on browser 

*  Edit php.ini,Modify the below variables as given.                                   (D:\installs\wamp64\bin\apache\apache2.4.39\bin\php.ini)
     max_execution_time = 2000
     max_input_time = 2000
  And save the file.

*  Edit httpd.config in apache path. 
(D:\installs\wamp64\bin\apache\apache2.4.39\conf\httpd.conf)
    enable "LoadModule version_module modules/mod_version.so"( remove the # before the line) and save

6) Restart the service in wampserver64 using restart all services.

7) open browser and load "localhost/magento2". you get the Magento setup process. 

Follow from #4 steps as given in http://agsdinesh.blogspot.com/2019/11/install-magento-2-on-localhost-using.html for Magento setup.

Good Luck 🙏

Here we go 


Thursday, 7 November 2019

Install Magento 2 on Localhost Using XAMPP

Requirements
The version I have used:
*Apache version: Apache/2.4.41 (Win64)
* XAMPP version: 3.2.4
* PHP version:7.1.33
* MySQL version: 8
* Magento version: 2.2.3

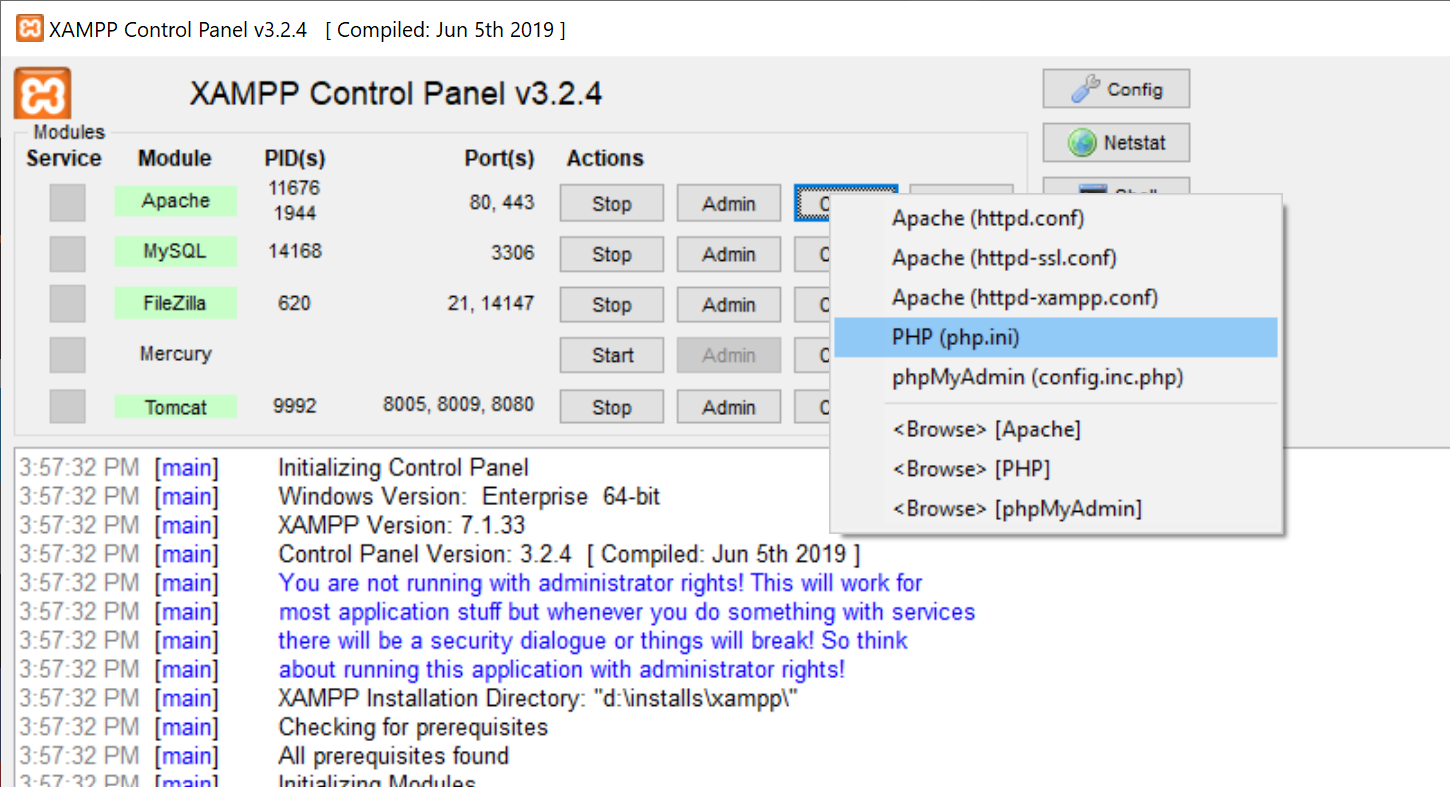
1) First, download and install the XAMPP. Follow the installation setup.
Once the installation done, Run the xampp control application.
Before starting the apache server, please enable few extensions in php config file.
 List of items to enable in php.ini

                                extension=php_intl.dll
                                 extension=php_xsl.dll
                                 extension=php_soap.dll
* Once done start the apache server, mysql, filezilla and Tomcat.
2) Create a mysql db named "magento2". In Xampp click in the Admin 
and you will get phpmyadmin. Then create a table in name "magento2"


3) Now we are good to get the Magento installation. Download the Magento from the link given above: Magento 2 setup
   Once download completed, extract the Magento zip files to xmapp installation directory under htdocs folder in name as magento
4) Open the web browser and explore localhost/magento. Then click on Agree and Setup Magento.

The first step for installing Magento 2 on localhost is to perform a Readiness check. After successful checking, click on Next.

Now the database configuration page will appear. Here, enter database details and database name which will be the same as the one you created in phpMyAdmin (magento2). After completing this step, click on Next.
Now complete the web configuration, put the 127.0.0.1 localhost ip, and admin panel address. After web configuration, click on Next.
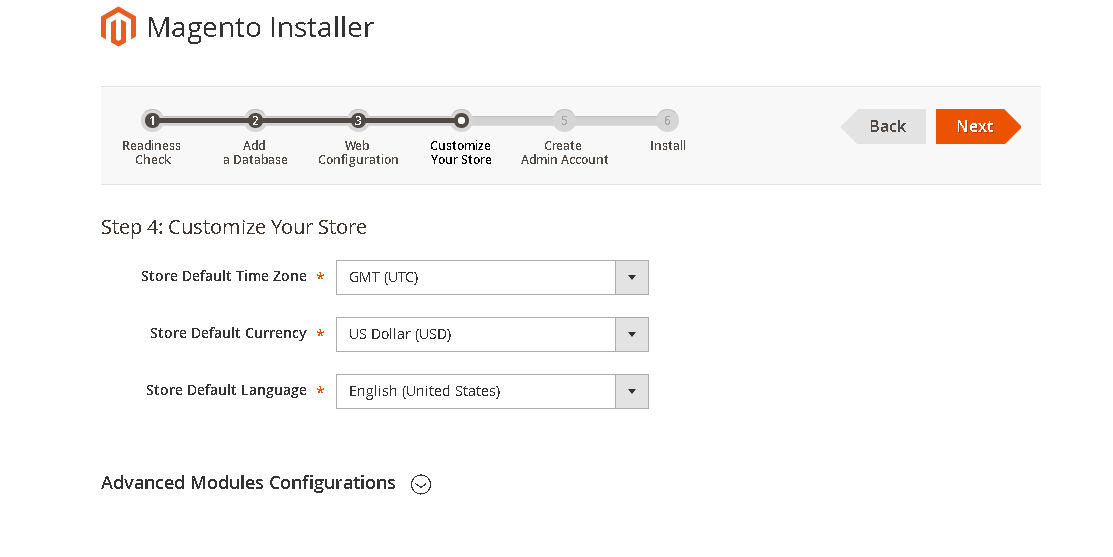
Now customize location and click on Next.

Create an Admin account and click on Next.
 * Remember the user id and password for future use 

Now we are ready to go. Just hit the Install, this may take a while.

Once the installation done, Open web browser and hit 127.0.0.1/magento. you should get home page. 


Admin Magento url will be: http://127.0.0.1/magento/admin

That's it you are done :) .....


PrtScr or Printscreen not working [Resolved]

Think your print screen not working, or you keep on hitting and nothing come up, no worries here is that thing to have in mind.

Windows 10 had made that different.

* Ctrl + PrtScr <- will just add the screen image to clipboard, means you manually need to paste somewhere in word or paint you choose it.

* Win + PrtScr key <- this save the screenshots in "pictures/screenshot" folder.


Hope saved your time.....  😉

How to know your Mobile number

*282# - airtel (verified) 
*888# - BSNL (verified) 
Call 1299 - Jio, will SMS with details (verified) 
*111*2# (not verified) 


Monday, 4 November 2019

Enable Developer Options on Xiaomi & Redmi Phones


  • Go to Settings >> About Phone >> MIUI version.
  • Tap on “MIUI version” for 7 times until developer mode appears. You’ll see the “You are now a developer” message appears on the screen.

Now go to Settings >> Additional Settings >> Developer Options, touch the toggle to enable Developer Option

Friday, 14 September 2018

Perl to download mp3 from the html page using wget

The script I have tried to get the mp3 files from the web.

#!/usr/bin/perl

die "Usage: $0 <url of page> \n" if @ARGV < 1;

sub getLineFromFile
{
my @outArray;
my $in = shift;
open (my $inf,"<",$in) or die "can't reader the $in";
while(my $row = <$inf>)
{
chomp $row;
#print $row."\n";
push (@outArray,$row);

return @outArray;
}

my $url = shift;
`wget $url`;

$url =~ /([^\/]+\.html)/; #Regex to look for last / and token next with .html 
my$filename = $1;

my @lines = getLineFromFile($filename);

foreach my $line (@lines)
{
my $command;
$line =~/<a .*href="(.*download.*\.mp3)">/; #modify if you find any different href url
my $mp3url = $1;
if($mp3url =~ /\.mp3$/){
#print "get me ".$mp3url."\n";
`wget $mp3url`;

}
}
unlink $filename;


hope it helps and save your time 👍

Monday, 27 August 2018

Install cv2 or opencv-python module in MACos

It took a while to figure out the issues during installing the OpenCV to my mac machine.
Here are the steps that I followed to fix it. maybe it could help you too...

I have opened the Terminal and gave "pip install OpenCV-python". Here the problem starts...


$ sudo -H pip install opencv-python
Password:
Collecting opencv-python
  Downloading https://files.pythonhosted.org/packages/ae/f7/01fc83414fbdbb470d6d77ee4a0fd32234046edc4a2e4f7897e3e95ee666/opencv_python-3.4.2.17-cp27-cp27m-macosx_10_6_x86_64.macosx_10_9_intel.macosx_10_9_x86_64.macosx_10_10_intel.macosx_10_10_x86_64.whl (42.2MB)
    100% |████████████████████████████████| 42.3MB 244kB/s 
Collecting numpy>=1.11.1 (from opencv-python)
  Downloading https://files.pythonhosted.org/packages/e7/c1/d5c47de35e366b1c2f60da88a24b25d3037b892417c5c3c5398313fb54f5/numpy-1.15.1-cp27-cp27m-macosx_10_6_intel.macosx_10_9_intel.macosx_10_9_x86_64.macosx_10_10_intel.macosx_10_10_x86_64.whl (24.5MB)
    100% |████████████████████████████████| 24.5MB 569kB/s 
matplotlib 1.3.1 requires nose, which is not installed.
matplotlib 1.3.1 requires tornado, which is not installed.
Installing collected packages: numpy, opencv-python
  Found existing installation: numpy 1.8.0rc1
Cannot uninstall 'numpy'. It is a distutils installed project and thus we cannot accurately determine which files belong to it which would lead to only a partial uninstall.
oops, here 😈 starts...
But no worries I got your back.

Here are the few steps that could solve it.

1) Install the tornado package.


$ sudo -H pip install tornado
Collecting tornado
  Downloading https://files.pythonhosted.org/packages/45/ec/f2a03a0509bcfca336bef23a3dab0d07504893af34fd13064059ba4a0503/tornado-5.1.tar.gz (516kB)
    100% |████████████████████████████████| 522kB 1.5MB/s 
Collecting futures (from tornado)
  Downloading https://files.pythonhosted.org/packages/2d/99/b2c4e9d5a30f6471e410a146232b4118e697fa3ffc06d6a65efde84debd0/futures-3.2.0-py2-none-any.whl
Collecting singledispatch (from tornado)
  Downloading https://files.pythonhosted.org/packages/c5/10/369f50bcd4621b263927b0a1519987a04383d4a98fb10438042ad410cf88/singledispatch-3.4.0.3-py2.py3-none-any.whl
Collecting backports_abc>=0.4 (from tornado)
  Downloading https://files.pythonhosted.org/packages/7d/56/6f3ac1b816d0cd8994e83d0c4e55bc64567532f7dc543378bd87f81cebc7/backports_abc-0.5-py2.py3-none-any.whl
Requirement already satisfied: six in /System/Library/Frameworks/Python.framework/Versions/2.7/Extras/lib/python (from singledispatch->tornado) (1.4.1)
Installing collected packages: futures, singledispatch, backports-abc, tornado
  Running setup.py install for tornado ... done
Successfully installed backports-abc-0.5 futures-3.2.0 singledispatch-3.4.0.3 tornado-5.1

2) Then install the nose package. "sudo -H pip install nose"

3) Actually, this should be the final step but as I have the older version of numpy. It has thrown a stone against 💣💣.

$sudo -H pip install opencv-python

Collecting opencv-python
  Using cached https://files.pythonhosted.org/packages/ae/f7/01fc83414fbdbb470d6d77ee4a0fd32234046edc4a2e4f7897e3e95ee666/opencv_python-3.4.2.17-cp27-cp27m-macosx_10_6_x86_64.macosx_10_9_intel.macosx_10_9_x86_64.macosx_10_10_intel.macosx_10_10_x86_64.whl
Collecting numpy>=1.11.1 (from opencv-python)
  Using cached https://files.pythonhosted.org/packages/e7/c1/d5c47de35e366b1c2f60da88a24b25d3037b892417c5c3c5398313fb54f5/numpy-1.15.1-cp27-cp27m-macosx_10_6_intel.macosx_10_9_intel.macosx_10_9_x86_64.macosx_10_10_intel.macosx_10_10_x86_64.whl
Installing collected packages: numpy, opencv-python
  Found existing installation: numpy 1.8.0rc1
Cannot uninstall 'numpy'. It is a distutils installed project and thus we cannot accurately determine which files belong to it which would lead to only a partial uninstall.

4) So to solve the above issue the numpy need to be updated.

$ sudo -H pip install --ignore-installed numpy
Collecting numpy
  Downloading https://files.pythonhosted.org/packages/e7/c1/d5c47de35e366b1c2f60da88a24b25d3037b892417c5c3c5398313fb54f5/numpy-1.15.1-cp27-cp27m-macosx_10_6_intel.macosx_10_9_intel.macosx_10_9_x86_64.macosx_10_10_intel.macosx_10_10_x86_64.whl (24.5MB)
    100% |████████████████████████████████| 24.5MB 642kB/s 
Installing collected packages: numpy
Successfully installed numpy-1.15.1

5) Now we are ready to install OpenCV

$ sudo -H pip install opencv-python
Collecting opencv-python
  Using cached https://files.pythonhosted.org/packages/ae/f7/01fc83414fbdbb470d6d77ee4a0fd32234046edc4a2e4f7897e3e95ee666/opencv_python-3.4.2.17-cp27-cp27m-macosx_10_6_x86_64.macosx_10_9_intel.macosx_10_9_x86_64.macosx_10_10_intel.macosx_10_10_x86_64.whl
Requirement already satisfied: numpy>=1.11.1 in /Library/Python/2.7/site-packages (from opencv-python) (1.15.1)
Installing collected packages: opencv-python
Successfully installed opencv-python-3.4.2.17


Hope this helps 👍 .....