Thanks to OpensSource ForYou
Pages
- Home
- My Drawings
- Computer
- Linux stuffs in Tamil[From Kaniyam]
- Articles/Messages that I came across
- Percentage Calculator
- General Stuffs :)
- படித்ததில் பிடித்தது (Padithathil Pidithathu)
- Tamil Books Online
- MAC OS Experience 🙊
- Cute Panda photo collection
- Only 90's Kids know this
- Bubble Solution Calculator
Search This Blog
Thursday, 18 March 2021
Monday, 2 December 2019
Whatsapp text tips
> Bold a text use * in front and back of the text. example *sample*
> Italic a text use _ in front and back of the text. example _sample_
> Strike a text use ~ in front and back of the text. example ~sample~
> Italic a text use _ in front and back of the text. example _sample_
> Strike a text use ~ in front and back of the text. example ~sample~
Sunday, 10 November 2019
Wget big file from google drive public shared files in Linux
wget --load-cookies /tmp/cookies.txt "https://docs.google.com/uc?export=download&confirm=$(wget --quiet --save-cookies /tmp/cookies.txt --keep-session-cookies --no-check-certificate 'https://docs.google.com/uc?export=download&id=FILEID' -O- | sed -rn 's/.*confirm=([0-9A-Za-z_]+).*/\1\n/p')&id=FILEID" -O FILENAME && rm -rf /tmp/cookies.txt
* FILENAME is what the filename in server with extension. example xdownload.zip
* FILEID is the id from google shared link. example "https://drive.google.com/file/d/12yLOgEUfM1tBxmrSkPHcJmeKenefeKN5/view?usp=sharing" in this link 12yLOgEUfM1tBxmrSkPHcJmeKenefeKN5 is the file id.
Hope it helps...👍
* FILENAME is what the filename in server with extension. example xdownload.zip
* FILEID is the id from google shared link. example "https://drive.google.com/file/d/12yLOgEUfM1tBxmrSkPHcJmeKenefeKN5/view?usp=sharing" in this link 12yLOgEUfM1tBxmrSkPHcJmeKenefeKN5 is the file id.
Hope it helps...👍
Magento 2 in localhost windows 10
Facing so many issues in running a Magento in the local environment on windows 10 😓. Yes I know that I too faced it. tried running the Magento in Xampp ended in issues while running the Magento admin...
But no worries here is a short solution. Don't worry its not a lengthy steps.
Here we go.
1) Download wamp 64 bit for windows 10. just google and get the last version. I have installed the 3.1.9 version. ( may this link will help). Run installation in administrator mode
2) Just install wherever you need. But have the path in mind.
3) Download Magento. (https://magento.com/tech-resources/download). I have gone version 2.2.5 ( just for reference). feel free to explore last and let me know.
4) Extract the Magento zip to Wamp www directory ( D:\Installs\wamp64\www) as magento2. after extraction path will be D:\Installs\wamp64\www\magento2
5) Check localhost in web browsers. you will get as below.
* Marked the php as 7.0.33, the magento 2 needs 7.0 or higher php version. if not having the same version choose for the wampserver64.
Here is the important setups before running localhost/magento2 on browser
* Edit php.ini,Modify the below variables as given. (D:\installs\wamp64\bin\apache\apache2.4.39\bin\php.ini)
max_execution_time = 2000
max_input_time = 2000
And save the file.
* Edit httpd.config in apache path.
(D:\installs\wamp64\bin\apache\apache2.4.39\conf\httpd.conf)
enable "LoadModule version_module modules/mod_version.so"( remove the # before the line) and save
6) Restart the service in wampserver64 using restart all services.
7) open browser and load "localhost/magento2". you get the Magento setup process.
Follow from #4 steps as given in http://agsdinesh.blogspot.com/2019/11/install-magento-2-on-localhost-using.html for Magento setup.
Thursday, 7 November 2019
Install Magento 2 on Localhost Using XAMPP
Requirements
- Apache 2.2 or More ..
- Download XAMPP
- PHP 7.0 and more
- MySQL 5.6, 5.7 or later
- Magento 2 setup
The version I have used:
*Apache version: Apache/2.4.41 (Win64)
* XAMPP version: 3.2.4
* PHP version:7.1.33
* MySQL version: 8
* Magento version: 2.2.3
1) First, download and install the XAMPP. Follow the installation setup.
Once the installation done, Run the xampp control application.
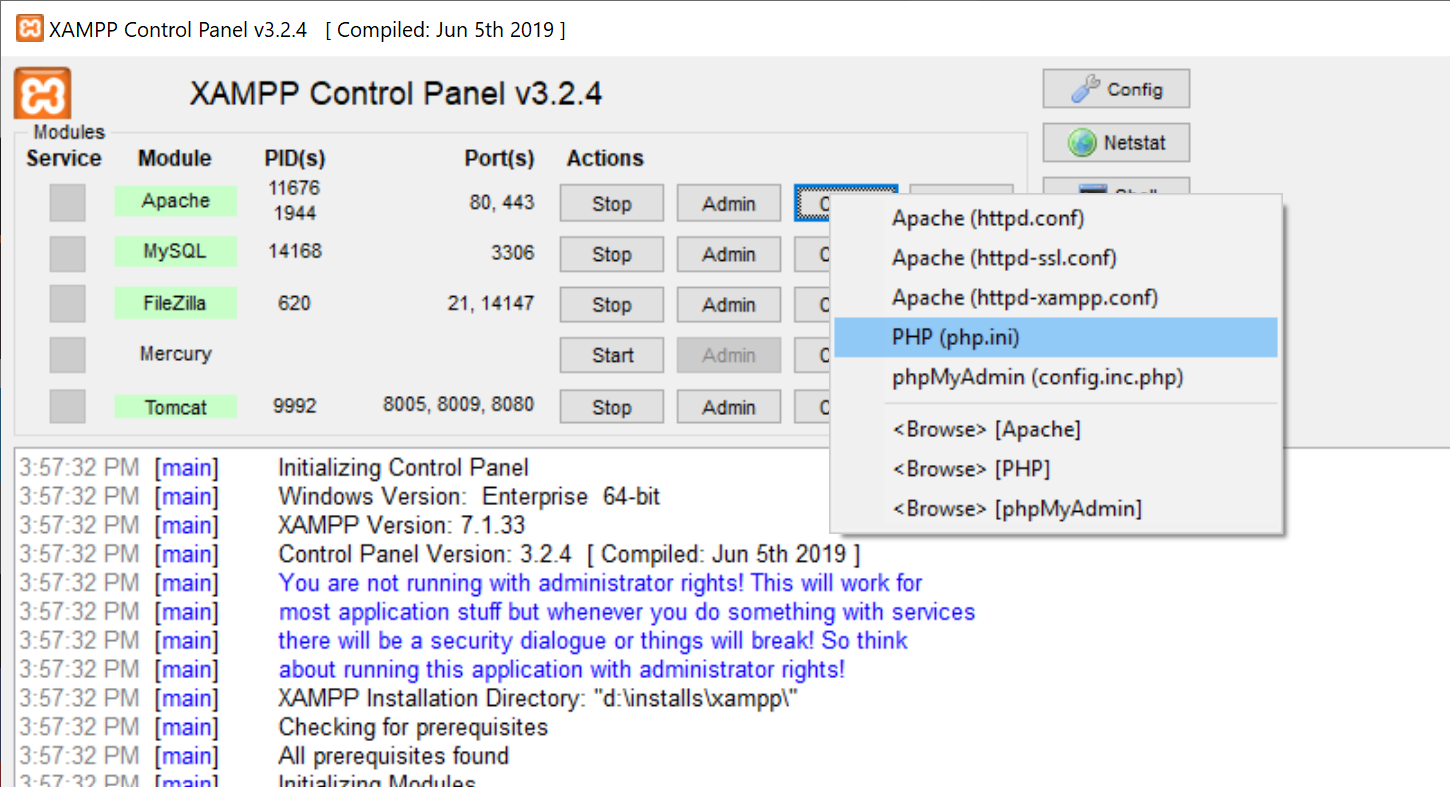
Before starting the apache server, please enable few extensions in php config file.
List of items to enable in php.ini
extension=php_intl.dll
extension=php_xsl.dll
extension=php_soap.dll
* Once done start the apache server, mysql, filezilla and Tomcat.
2) Create a mysql db named "magento2". In Xampp click in the Admin
and you will get phpmyadmin. Then create a table in name "magento2"
3) Now we are good to get the Magento installation. Download the Magento from the link given above: Magento 2 setup
Once download completed, extract the Magento zip files to xmapp installation directory under htdocs folder in name as magento
4) Open the web browser and explore localhost/magento. Then click on Agree and Setup Magento.
The first step for installing Magento 2 on localhost is to perform a Readiness check. After successful checking, click on Next.
Now the database configuration page will appear. Here, enter database details and database name which will be the same as the one you created in phpMyAdmin (magento2). After completing this step, click on Next.
Now complete the web configuration, put the 127.0.0.1 localhost ip, and admin panel address. After web configuration, click on Next.
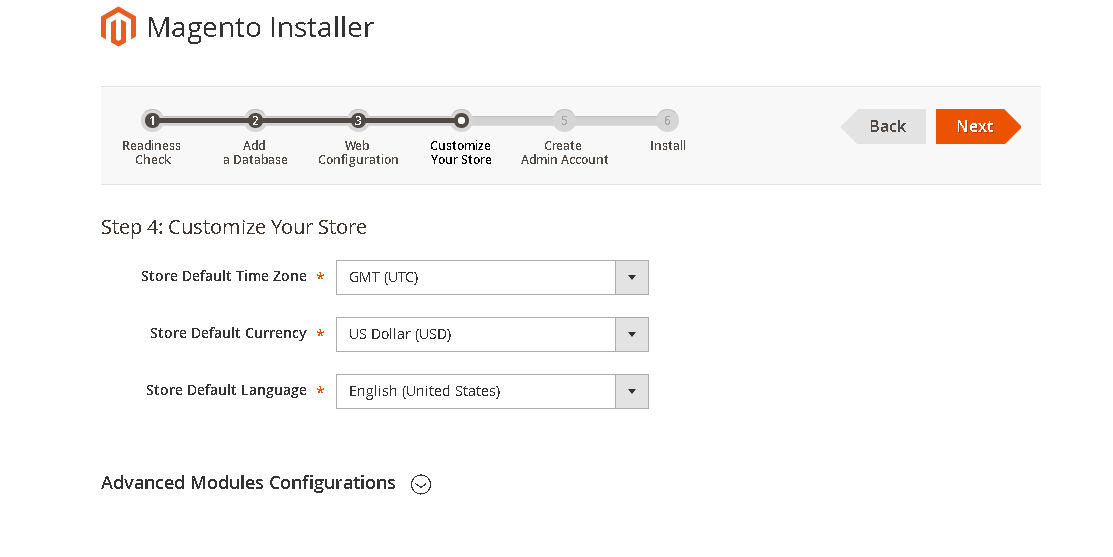
Now customize location and click on Next.
Create an Admin account and click on Next.
* Remember the user id and password for future use
Now we are ready to go. Just hit the Install, this may take a while.
Once the installation done, Open web browser and hit 127.0.0.1/magento. you should get home page.
Admin Magento url will be: http://127.0.0.1/magento/admin
That's it you are done :) .....
extension=php_xsl.dll
extension=php_soap.dll
* Once done start the apache server, mysql, filezilla and Tomcat.
2) Create a mysql db named "magento2". In Xampp click in the Admin
and you will get phpmyadmin. Then create a table in name "magento2"
PrtScr or Printscreen not working [Resolved]
Think your print screen not working, or you keep on hitting and nothing come up, no worries here is that thing to have in mind.
Windows 10 had made that different.
* Ctrl + PrtScr <- will just add the screen image to clipboard, means you manually need to paste somewhere in word or paint you choose it.
* Win + PrtScr key <- this save the screenshots in "pictures/screenshot" folder.
Hope saved your time..... 😉
Windows 10 had made that different.
* Ctrl + PrtScr <- will just add the screen image to clipboard, means you manually need to paste somewhere in word or paint you choose it.
* Win + PrtScr key <- this save the screenshots in "pictures/screenshot" folder.
Hope saved your time..... 😉
How to know your Mobile number
*282# - airtel (verified)
*888# - BSNL (verified)
Call 1299 - Jio, will SMS with details (verified)
*111*2# (not verified)
*888# - BSNL (verified)
Call 1299 - Jio, will SMS with details (verified)
*111*2# (not verified)
Subscribe to:
Posts (Atom)